SSH port forwarding creates a secure tunnel between the client and server computers. As the connection is encrypted, SSH tunneling is useful for transmitting unencrypted (or non secure) protocols such as POP3, VNC, RDT, etc. SSH port forwarding also allows you to connect computers from two different networks that are not able to communicate with each other directly. In this article, we are going to see how we can use SSH tunnels to forward TCP and UDP packets.
Network
This is going to be our network scenario for this article.
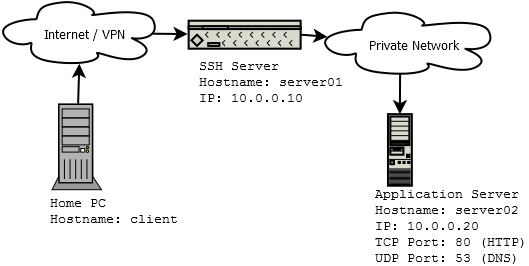
The client computer will establish a SSH session to server server01 and access services (TCP port 80 and UDP port 53) on server server02.
We are also only going to talk about local port forwarding and not remote port forwarding. Local port forwarding lets you connect from your local computer to another server via the SSH server. Remote port forwarding is to connect the other way round – from a server to your computer or to another server via the SSH client.
Tools Required for SSH Port Forwarding
For the CLI based SSH client, we will be using the standard ssh program – an OpenSSH based SSH client. This is found in all Linux distributions. If you are looking for a CLI based OpenSSH client on Windows, install a copy of Cygwin.
PuTTY will be used as the GUI based SSH client. This is optional and not really required.
SSH only allows TCP port forwarding. To relay UDP packets, we will be using socat – a multipurpose relay (SOcket CAT). Under UNIX or Linux, install socat by using the default package installation utility. On Ubuntu, you would need to do something like this:
|
1 |
$ sudo apt-get install socat |
Perform a Google search if you are looking for a socat binary for Windows.
SSH Port Forwarding for TCP
SSH supports forwarding of TCP ports by default, so this is going to be the easiest. We will tunnel port 80 (HTTP) on server02 to port 8000 on the client.
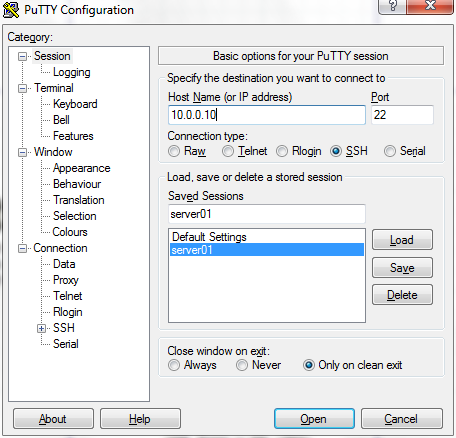
On PuTTY, create a new session towards the server.
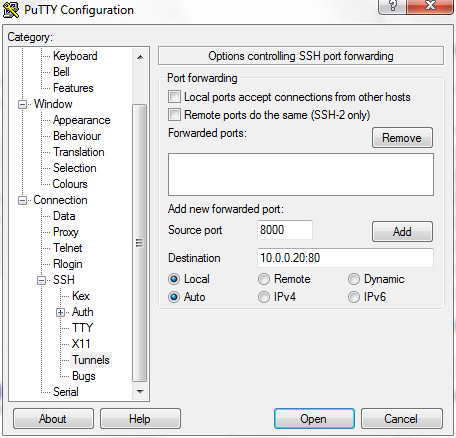
Next, navigate to Connection->SSH->Tunnels, enter “8000” on the Source Port field and “10.0.0.20:80” on the Destination field. Click on the ‘Add’ button and you will see “L8000 10.0.0.20:80″ appear in the ‘Forwarded ports’ list.
Now save the PuTTY SSH session by navigating to the ‘Session’ category. Once the session is saved, login to the ssh server (server01) by clicking the ‘Open’ button at the bottom. Login to the server by entering the login credentials when prompted. Port forwarding is now enabled.
To perform the same action from the CLI, execute the ssh command in the following manner on the client computer:
|
1 |
client$ ssh -L 8000:10.0.0.20:80 user@server01 |
The above command tells the ssh program to listen on TCP port 8000 on the client computer and forward it to TCP port 80 on server02 (10.0.0.20).
The SSH tunnel is now established. To test the connection, use a HTTP client (curl command or your browser) and point it to http://127.0.0.1:8000. You should be able to get a response from the HTTP server running on server02.
|
1 |
client$ curl http://127.0.0.1:8000 |
This type of port forwarding will not work for FTP sessions. To tunnel FTP sessions, read this article: SSH Port Forwarding for FTP
SSH Port Forwarding for UDP
UDP port forwarding is a bit more complicated. We will need to convert the packets from UDP to TCP on the SSH client side, tunnel it over the SSH connection and convert it back from TCP to UDP on the SSH server side. We will tunnel UDP port 53 on server02 to UDP port 53000 on the client. We will use TCP port 8000 for the SSH tunnel.
The packet flow is shown in the diagram below.
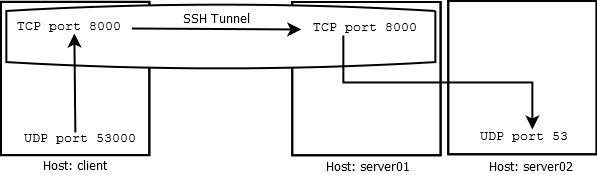
DNS requests sent to UDP port 53000 are relayed to TCP port 8000 on the client computer. The packet is then tunneled via the SSH connection. On server01, at the end of the SSH tunnel, the TCP packet on port 8000 is converted back to UDP and gets forwarded to server02 on UDP port 53. The reply flows back in a similar fashion.
Setup the SSH tunnel on TCP port 8000 by making a SSH connection from the client computer to server01.
|
1 |
client$ ssh -L 8000:127.0.0.1:8000 user@server01 |
The above command will instruct ssh program to listen on TCP port 8000 on the client computer and forward it to TCP port 8000 on server01 local interface (127.0.0.1).
Next, configure TCP-UDP relay on server01 using socat.
|
1 |
server01$ socat tcp4-listen:8000,reuseaddr,fork udp:server02:53 |
The above command instructs socat to listen on TCP port 8000 and redirect it to UDP port 53 towards server02.
Next, we also need to configure a UDP-TCP relay on client computer using socat.
|
1 |
client$ socat -T15 udp4-recvfrom:53000,reuseaddr,fork tcp:localhost:8000 |
This time we are telling socat to listen on UDP port 53000 and redirect it to TCP port 8000 on the loopback interface. The SSH tunnel will deliver the packets on TCP port 8000 to the server (server01).
Once done, we can test the tunnel by performing a simple DNS query on the client computer. We will need to specify the nameserver IP address of 127.0.0.1 as well as the port number of 53000 to the DNS query tool.
|
1 |
client$ dig @127.0.0.1 -p 53000 google.com |
Mohamed Ibrahim
ibrahim = { interested_in(unix, linux, android, open_source, reverse_engineering); coding(c, shell, php, python, java, javascript, nodejs, react); plays_on(xbox, ps4); linux_desktop_user(true); }
