I recently upgraded to a Buffalo WZR-HP-G300NH home broadband router after my Linksys WRT54GL router running on DD-WRT died on me. I was looking for a router that could support the custom DD-WRT firmware, USB storage, BitTorrent downloads, Optware and with Wireless-N capability. The Buffalo WZR-HP-G300NH simply met all my requirements!
This article will guide you on how to install a vanilla version of DD-WRT on the router together with the Transmission BitTorrent client running on top of Optware.
Install DD-WRT
Buffalo ships the current models of the WZR-HP-G300NH routers with DD-WRT firmware, but features like SSH are disabled. I was also unable to install additional packages using Optware, therefore I decided to mod the router with a vanilla version of DD-WRT.
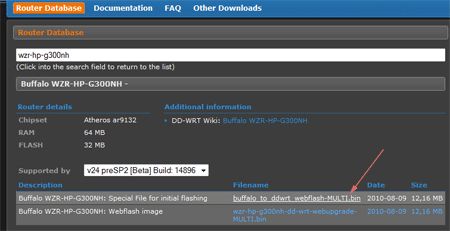
For the normal DD-WRT releases, goto DD-WRT Router Database and enter WZR-HP-G300NH in the search box. Download the image which is used for the initial flashing.
For the latest DD-WRT releases, go here and navigate to “Downloads -> others -> eko -> BrainSlayer-V24-preSP2” and navigate further into the latest DD-WRT firmware build directory and download the latest available firmware images.
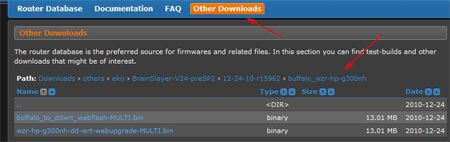
Flash the router using the router’s web interface once you have downloaded the firmware. I am using the latest DD-WRT firmware that was released on the 24-Dec-2010. Remember to change the password and configure the router as necessary. I will not go into details on the basic configuration for the router as the DD-WRT wiki site has all the necessary details.
Prepare USB Disk
To use the USB disk with the router, at least one of the partitions has to be formatted as ext2 or ext3. I recommend to use the ext3 partition. If you do not have a Linux machine to do the partitioning, do not panic. You can use the MiniTool Partition Wizard Home Edition to modify the partitions of the USB disk within Windows. Create a primary partition and format it as ext3.
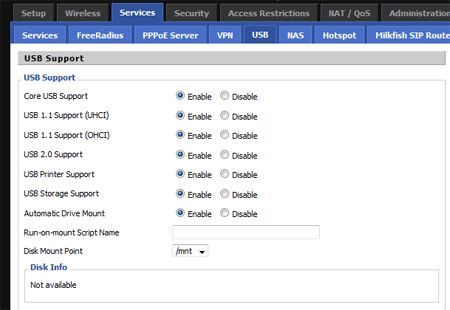
Before plugging in the USB disk to the router, enable the USB support in the router. Under DD-WRT web gui, navigate to “Services -> USB” and turn on all the features and set the mount point to be “/mnt”.
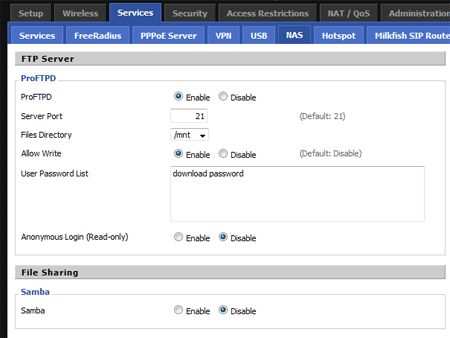
To transfer files between the USB disk and to my PC, I use FTP. Enable FTP in the router by navigating to “Services -> NAS”. You can specify username-password combinations for the FTP login if necessary.
Connect the USB disk to the router once you are done.
Directory and mount-point structure
I am using the following directory structure:
/mnt: mount point for the USB disk/mnt/d01/torrent: directory used to hold the torrent configuration as well as the torrent downloads/mnt/opt_xxeg./mnt/opt_01,/mnt/opt_02: different optware installation directories for different possible optware builds/opt: this directory will be mounted with a loopback device by pointing to one of the optware directories (eg./mnt/opt_xx). this will give the flexibility to test different optware packages just by mounting a different source directory.
Configure Optware and Transmission
The default Optware packages for DD-WRT are built for the mipsel architecture. The Buffalo WZR-HP-G300NH is using Atheros chipset which is based on mips architecture. I got the optware packages for this router from OpenWrt site. Do note that the optware packages will be accessible via a chroot’ed environment.
To proceed further, you will need a SSH client. I am using the free PuTTY SSH client. SSH to the router and run the following commands.
|
1 2 3 4 5 6 7 8 9 10 11 12 13 14 15 16 17 |
# touch /mnt/optware.enable # mkdir /mnt/opt_01 # cd /mnt/opt_01 # mkdir dev ; mkdir sys ; mkdir proc ; mkdir tmp ; mkdir -p var/lock ; mkdir d01 # mkdir -p /mnt/d01/torrent/dl # mkdir -p /mnt/d01/torrent/.config/transmission # mkdir -p /mnt/d01/torrent/.incomplete # mkdir -p /mnt/d01/torrent/.watch # wget http://downloads.openwrt.org/backfire/10.03.1-rc3/ar71xx/openwrt-ar71xx-rootfs.tar.gz # tar xzvf openwrt-ar71xx-rootfs.tar.gz # echo "export PS1='[\u@\h:(chroot)\w]\$ '" >> /mnt/opt_01/etc/profile # mkdir /opt # mount -o bind /mnt/opt_01 /opt # mount -o bind /mnt/d01 /opt/d01 # for fs in dev sys proc tmp ; do mount -o bind /$fs /opt/$fs ; done # cd / # chroot /opt /bin/sh --login |
You should now be in a chroot’ed optware environment. Continue installing the optware packages.
|
1 2 3 4 5 6 7 |
# opkg update # opkg --force-overwrite install coreutils # opkg install transmission-daemon # opkg install transmission-remote # opkg install transmission-cli # opkg install transmission-web # opkg install tune2fs |
Now, modify the configuration file, /etc/config/transmission (in the chroot’ed environment), which is used for the Transmission BitTorrent client. The contents of my configuration file can be found below. Take note of the directory related options.
|
1 2 3 4 5 6 7 8 9 10 11 12 13 14 15 16 17 18 19 20 21 22 23 24 25 26 27 28 29 30 31 32 33 34 35 36 37 38 39 40 41 42 43 44 45 46 47 48 49 50 51 52 53 54 55 56 57 58 59 60 61 62 |
config transmission option enable 1 option config_dir '/d01/torrent/.config/transmission' option alt_speed_down 50 option alt_speed_enabled false option alt_speed_time_begin 540 option alt_speed_time_day 127 option alt_speed_time_enabled false option alt_speed_time_end 1020 option alt_speed_up 50 option bind_address_ipv4 '0.0.0.0' option bind_address_ipv6 '::' option blocklist_enabled false option dht_enabled true option download_dir '/d01/torrent/dl' option encryption 1 option incomplete_dir '/d01/torrent/.incomplete' option incomplete_dir_enabled false option lazy_bitfield_enabled true option lpd_enabled false option message_level 2 option open_file_limit 32 option peer_limit_global 240 option peer_limit_per_torrent 60 option peer_port 51413 option peer_port_random_high 65535 option peer_port_random_low 49152 option peer_port_random_on_start false option peer_socket_tos 0 option pex_enabled true option port_forwarding_enabled true option preallocation 1 option proxy "" option proxy_auth_enabled false option proxy_auth_password '' option proxy_auth_username '' option proxy_enabled false option proxy_port 80 option proxy_type 0 option ratio_limit 2.0000 option ratio_limit_enabled false option rename_partial_files true option rpc_authentication_required false option rpc_bind_address '0.0.0.0' option rpc_enabled true option rpc_password '' option rpc_port 9091 option rpc_username '' option rpc_whitelist '127.0.0.1,192.168.1.*' option rpc_whitelist_enabled true option script_torrent_done_enabled false option script_torrent_done_filename '' option speed_limit_down 4096 option speed_limit_down_enabled true option speed_limit_up 32 option speed_limit_up_enabled true option start_added_torrents true option trash_original_torrent_files false option umask 18 option upload_slots_per_torrent 14 option watch_dir_enabled false option watch_dir '/d01/torrent/.watch' |
Exit out of the chroot’ed enviroment and unmount the USB disk.
|
1 2 3 4 5 |
# exit # for fs in dev sys proc tmp ; do umount /opt/$fs ; done # umount /opt/d01 # umount /opt # umount /mnt |
Enable Autostart of Transmission BitTorrent Client
To automatically start the Transmission client during the router’s startup, we will need to make use of DD-WRT’s startup scripts.
The scripts will auto-mount the USB disk on startup and will also start the torrent client. Once the USB disk is mounted, the scripts will also enable the blue LED at the back of the router. When the disk is unmounted, the blue LED will be turned off.
The scripts will also configure the AOSS switch on the router as a toggle switch. Upon every press of the switch, the scripts will automatically either mount or unmount the USB disk. In this way, you may press the AOSS button to shutdown the torrent client and also to unmount the USB disk before you poweroff the router.
From DD-WRT web interface, navigate to “Administration -> Commands”.
Copy the following code and save it to the ‘Custom Script section:
|
1 2 3 4 5 6 7 8 9 10 11 12 13 14 15 16 17 18 19 20 21 22 23 24 25 26 27 28 29 30 31 32 33 34 35 36 37 38 39 40 41 42 43 44 45 46 47 48 49 50 51 52 53 54 55 56 57 58 59 60 61 62 63 64 65 66 67 68 69 70 71 72 73 74 75 76 77 78 79 80 81 82 83 84 85 86 87 88 89 90 91 92 93 94 95 96 97 98 99 100 101 102 103 104 105 106 107 108 109 110 111 112 113 114 115 116 117 118 119 120 121 122 123 124 125 126 127 128 129 130 131 132 133 134 135 136 137 138 139 140 141 142 143 144 145 146 147 148 149 150 151 152 153 154 155 156 157 158 159 160 |
#!/bin/sh # usb mount/umount script, this script will be saved in /tmp/custom.sh # this is where the usb disk will be mounted USBMP=/mnt # directory pointintg to the physical optware root OROOT=$USBMP/opt_01 # directory to mount the optware root; $OROOT will be mounted under this dir OMP=/opt # directory where the torrent data resides in the usb disk TORRENTROOT=$USBMP/d01 # directory to mount the torrent data; must be somewhere under optware root # $TORRENTROOT will be mounted under this dir TORRENTMP=$OMP/d01 # GPIO USB led number GPIO_LED_USB=0 # usb partition 1 device USBPART1=/dev/sda1 USBFS=ext3 # aoss button script; refer to http://www.dd-wrt.com/wiki/index.php/Script_Execution AOSS_SCRIPT=/tmp/etc/config/usbdisk.sesbutton # pidfile PIDFILE=/var/run/rc_custom.pid BIN=rc_custom # the PATH was not set correctly and chroot was not found initially, # therefore set the PATH variable PATH=$PATH:/opt/sbin:/opt/bin:/opt/usr/sbin:/opt/usr/bin # debug flag debugon=1 # will return 0 if mounted is_usb_mounted () { grep -q $USBPART1 /proc/mounts } usb_mount () { debugprint "attempting to mount usb" logger -p info -t $BIN "attempting to mount usb" # if partition does not exist, just terminate [ -z "$USBPART1" ] && exit 0 debugprint "usb disk found" sleep 2 mount -t $USBFS $USBPART1 $USBMP # turn on USB led if mounted gpio enable $GPIO_LED_USB is_usb_mounted [ $? -eq 0 ] && ( debugprint "usb mounted" ; gpio disable $GPIO_LED_USB ) if [ -f $USBMP/optware.enable ]; then mount -o bind $OROOT $OMP #mount -o bind $OMP/etc /etc for fs in dev sys proc tmp ; do mount -o bind /$fs /$OMP/$fs ; done mount -o bind $TORRENTROOT $TORRENTMP mkdir /$OMP/var/lock echo UTC > /tmp/TZ chroot $OMP /etc/init.d/transmission start sleep 5 [ -n "`pidof transmission-daemon`" ] && debugprint "transmission-daemon started" fi } usb_umount () { debugprint "attempting to umount usb" logger -p info -t $BIN "attempting to umount usb" # transmission takes a while to terminate n=1 while true; do chroot $OMP /etc/init.d/transmission stop sleep 1 [ ! -n "`pidof transmission-daemon`" ] && break sleep 4 [ $n -gt 5 ] && break let n+=1 done # sometimes transmission is not killed properly, if not killed, do not proceed [ -n "`pidof transmission-daemon`" ] && return debugprint "transmission-daemon killed" umount $TORRENTMP for fs in dev sys proc tmp ; do umount $OMP/$fs ; done #umount /etc umount $OMP umount $USBMP # turn off USB led if not mounted is_usb_mounted [ $? -eq 1 ] && ( debugprint "usb unmounted" ; gpio enable $GPIO_LED_USB ) } prepare_aoss_script () { #prepare for disk mount/umount when AOSS button is pressed # return if file is already there mkdir -p `dirname $AOSS_SCRIPT` ln -s /tmp/custom.sh $AOSS_SCRIPT } debugprint () { [ $debugon -eq 1 ] && printf "usbmount: %s\n" "$1" } # before doing anything, check if we are already running [ -f $PIDFILE ] && [ -d /proc/`cat $PIDFILE` ] && exit echo $$ > $PIDFILE mountarg=usbumount is_usb_mounted [ $? -eq 1 ] && mountarg="usbmount" [ $# -eq 1 ] && mountarg=$1 case "$mountarg" in usbmount) #is_usb_mounted #[ $? -eq 1 ] && usb_mount usb_mount ;; usbumount) is_usb_mounted [ $? -eq 0 ] && usb_umount ;; prepareaoss) prepare_aoss_script ;; *) exit ;; esac rm -rf $PIDFILE |
Copy the following code and save it to the Startup section:
|
1 2 3 4 |
sleep 20 /tmp/custom.sh usbmount /tmp/custom.sh prepareaoss |
Copy the following code and save it to the Shutdown section:
|
1 |
/tmp/custom.sh usbumount |
Finally, we will need to open the firewall ports for the torrent client to work. Copy the following code and save it to the Firewall section:
|
1 2 |
iptables -I INPUT 1 -p tcp --dport 51413 -j logaccept iptables -I INPUT 1 -p udp --dport 51413 -j logaccept |
Save the changes and reboot the router for the changes to take effect.
The web interface for the Transmission BitTorrent client can be accessed on port 9091. If your router’s IP address is 192.168.1.1, try opening the URL http://192.168.1.1:9091/ from your browser.
Final Notes
- To access the chroot’ed Optware environment, run the following chroot command within a SSH session:
1# chroot /opt /bin/sh --login
- The block device that I am using in the script to point to the USB disk is
/dev/sda1. In older DD-WRT firmwares, it used to be/dev/scsi/host0/bus0/target0/lun0/part1. - You may want to perform a manual filesystem check on the USB disk once a while to check for a possible filesystem corruption, if any.
- Buffalo has an alternate DD-WRT (Professional) firmware version for this router, but this firmware does not seem to work on Asian models of the same router model.
- The latest Optware packages from OpenWrt can be downloaded from http://downloads.openwrt.org/snapshots/trunk/ar71xx/packages/. But the torrent downloads were frequently getting corrupted with the latest snapshots, therefore I opted for an older build of Optware.
Mohamed Ibrahim
ibrahim = { interested_in(unix, linux, android, open_source, reverse_engineering); coding(c, shell, php, python, java, javascript, nodejs, react); plays_on(xbox, ps4); linux_desktop_user(true); }
